
BigBlueButton via Moodle is an effective tool to use for presentations, seminars and lectures. For example, you can use this tool to poll your students or make presentations available to them. Students can give feedback in the chat or via audio.
Aktuelles
13.08.2020 - Hinweise zum Importieren von Aufzeichnungen in nächstes Semester
Um bereits vorhandene Aufzeichnungen aus BigBlueButton in Folgesemestern nutzen zu können, verwenden Sie bitte die Funktion "Aufnahmelinks importieren".
Hierbei können Sie nicht nur Videos aus Kursen des gleichen Semesters, sondern auch aus unterschiedlichen Semestern in einer BigBlueButton-Aktivität anzeigen und dadurch für Studierende zugänglich machen.
Please note that the maximum number of participants is 100 students for each session.
If you have more than 100 students, you can record your lecture and share it with the students afterwards.
Details:
If you are experiencing any problems, please use a different web browser (not all web browsers are fully supported).
Please do not use BigBlueButton while a VPN connection is active. This may cause interruptions.
Contents
The BigBlueButton activity is intended to be used only once or for the duration of a session.
If you would like to use this activity for more than one course unit, create multiple identical activities or duplicate an already existing one.
Part 1 - Preparation and implementation in Moodle
Adding to Moodle
To use BigBlueButton as part of your Moodle course, you first have to integrate it by selecting Add an activity or resource.

Configuration
1. Selecting the Instance type:
You can choose between three options:
- Room/Activity only: Basic use of the session with a live presentation (without the recording function enabled)
- Room/Activity with recordings: Use of the session as a live presentation as well as additional recordings (accessible to students in Moodle after the session has ended)
- Recordings only: Already existing recordings can be displayed via this function (currently not enabled)

You can access the recording function in BigBlueButton itself.
2. As with any Moodle activity, define the General settings:
- Name your session under Virtual classroom name (this will be displayed as a link in the Moodle course).
- If necessary, add further information under Description. Tick Display description on course page if you would like the description to be visible.
- To notify students of the creation of a new BigBlueButton activity, enable the option Send notification.

3. Under Activity/Room settings you can leave a Welcome message and decide whether students can join the session before the moderator enters the session. If you choose to enable this option, you should leave a welcome text for your students.

4. Under Presentation content you can add one file (number of files is limited!) that you can use as a presentation during the session. Recommended file formats are Office documents (.ppt, .pptx, .odp etc.) and PDF files.
If you want to upload further files or files during the session, you can do so directly in the BigBlueButton classroom (see Uploading a presentation).
Uploaded files are automatically visible to students in Moodle. If you do not want the files to be automatically visible, please upload the file directly in BigBlueButton (see Uploading a presentation).

5. In the section Participants you first have to define which Moodle course participants may join the session.
- All enrolled participants
- Participants with a specific Role in the course

Next, you have to decide what function they have in the session:
Moderator: has extensive permissions and leads the session (teachers, tutors)
Viewer: participates in the session and can be given more permissions by the moderator (students)

6. You can control access to the session by using the Schedule. You can set the start and end date of the session, between which students may join the session. Outside of this time frame students can still see the activity on the course page but are unable to join.
We recommend to always set both a start and end date so that server resources are available for other sessions.

7. Further options to customise the activity can be found in the following sections: Common module settings, Restrict access and Tags. These options include the availability of the activity on the course page and the group mode, for example.
8. Save your settings and return to the course page.
![]()
Accessing the virtual classroom
1. Click the new activity you created on the course page (the date of the session).
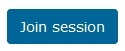
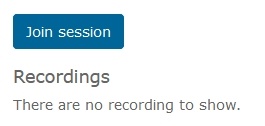
2. Within the time period you specified under Schedule for session, the option Join session will appear, that both the moderator and the viewers can see. Click this button to join the session.
This button will not be visible to the moderator or the viewers outside of the specified time period.
If you ticked the box in Activity/Room settings that allows viewers to join the session before the moderator enters the session, the button will be displayed. However, viewers cannot access BigBlueButton until the moderator is present.
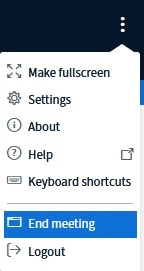
Ending a session
There are two ways to end a session:
1. Automatically when the time period you specified under Schedule for session ends.
2. Manually by clicking the End session button. This button will be displayed on the right-hand side of the “Join” button as soon as you click it to start the session (see screenshot).

Part 2 - Using BigBlueButton
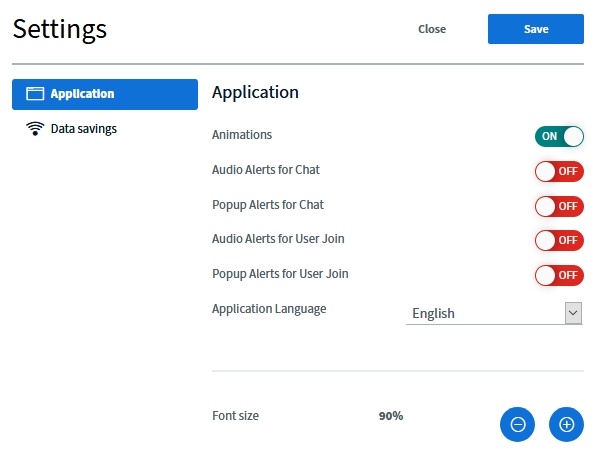
By default, BigBlueButton is displayed in the language you selected for your web browser. You can change this setting manually any time by clicking on Settings.
Getting started
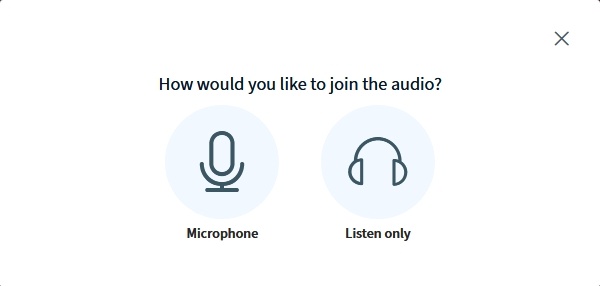
You have to pass all of the following steps to set up your audio successfully.
If you skip some of them - e.g. because of inadvertent closing a message window - your microphone can't be connected with BigBlueButton. In this case your recordings will not include audio!
At the beginning you will be asked if you would like to join the audio with a microphone or would like to listen only.
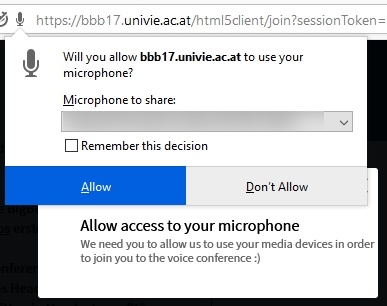
As a teacher you have to choose the option "Microphone". In the following step you will be asked to allow BigBlueButton to use your microphone (the view of the message can vary, due to the used browser).
Furthermore you have to to an echo test to check whether your audio is working and configured correctly or not:

If you hear audio, please choose the button "Yes". Your audio is now working properly.
If not, please choose the button "No". Therefore a further check of your audio settings will start.
You can use the following functions to customise the session:
- Uploading presentations in different file formats
- Recording sessions
- Creating and editing notes (also by students if needed)
- Sharing audio, webcam and/or screen
- Chat feature, both private and public
- Sharing videos
- Writing/drawing on uploaded slides (Whiteboard function)
- Polls with a maximum of 5 answer choices
Dividing students into breakout rooms for short group projects (up to 8 groups) - instructions will follow
You can find information about editing the permissions of participating students under Editing participant permissions.
Uploading a presentation
You can upload a presentation when creating the activity. If you have not done so already, you can do so now.
Click the plus icon in the default presentation. 
Office documents (.ppt, .pptx, .odp, etc.) and PDF files are supported.
Recording sessions
If you selected the instance type Room/Activity with recordings, you can now record the session in the BigBlueButton virtual classroom. If you have activated your microphone, you can record both audio and video.
Using this option allows you to record the session and make it accessible to students afterwards. This is especially useful for large courses, since the maximum number of session participants is 100 students.
To make a record only (cf. Screencast, ...), you can hide the activity after adding to Moodle and change the visibility again after recording.
Comment:
The button presentation will not be visible - also for teachers - as long as the activity is hidden.
To be able to play the recordings, you have to change the visibility briefly to be able to click on the button presentation (and hide it again afterwards).
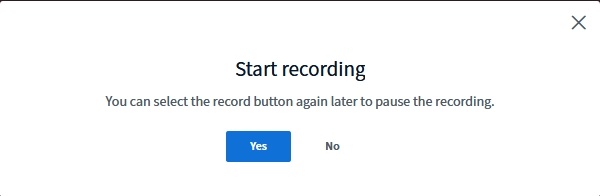
To start a recording, click the Start recording button above the presentation area. Confirm that you want to start the recording by clicking Yes in the dialog window.

The recording starts immediately but can be paused at any time by clicking the button again. To continue the recording, click Resume recording. The recording will be saved automatically as soon as you select End meeting. It is not necessary for you to do anything else.
Please be patient after ending the meeting. The video is rendered in the background and will be available to you a few minutes later / several hours later (depending on server capacities and the length of the recording).
The recording will only be accessible to students after the session has ended. You can edit some elements of the recording after the session has ended.

Creating and editing notes
You can create notes by clicking Shared Notes above the list of participants. On the right-hand side, instead of the chat, you will now see a field where you can add your notes.
These notes will not be saved. If you would like to keep your notes at the end of the session, you can download them by clicking the button on the right-hand side.
The upper toolbar displays all functions with which you can highlight and edit the text:
![]()
- Bold
- Italic
- Underline
- Strikethrough
- Ordered list
- Unordered list
- Undo most recent action
- Redo most recently undone action
- Export all notes as file
Sharing audio, webcam and/or screen
You can decide to share audio and video via the bar at the bottom in the middle of your screen:
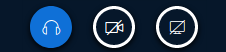
- Click the left button to restore your default settings. If you accidentally chose the wrong settings when entering the virtual classroom, you can rectify that here.
- Click the middle button to turn your webcam on and off.
- Click the right button to start or stop sharing your screen.
Chat feature
You can communicate with all students through public chat or with individual users through private chat.
Click on the person you want to chat with in the bar on the left. For every new message you receive you will see a white number displayed on a red background.
Playing videos
Click the plus button on the bottom left and select Share an external video to share videos from external video providers.
The following providers are supported:
- Youtube
- Vimeo
- Instructure Media
- Twitch
- Daily Motion
Writing and drawing on slides (whiteboard)
Further options to interact with your slides are located on the right-hand side in the middle.
Click the hand to change tools. The following tools are available:
- Hand: All students see a dot on the slides where your cursor is (similar to a laser pointer).
- Line, triangle, ellipse, rectangle: Draw the respective geometric shape on the slides. Hold down the mouse button to draw.
- Pencil: Directly draw any shape with a pencil.
Use the buttons below to undo the most recent action, clear all annotations and allow all participants to use the drawing tool.
Turn multi-user whiteboard on should only be selected when working in very small groups, since all users can draw on the slides at the same time. In larger groups this may cause your web browser to crash.
- Saving annotations on the slides and later publishing or downloading them is currently not possible with BigBlueButton. An alternative would be to take a screenshot or use external tools (see also tips under the CTL information for remote learning). Annotations are only saved temporarily and are automatically deleted after the session has ended and the moderator has left. Please inform your students about this.
Creating polls
You can ask your students one question at a time by using a poll.
To create a poll, click the plus button on the bottom left: Then click Start a poll.
There are different types of polls you can choose from:
- Yes/No Choices
- 2-5 answer choices indicated by numbers (you would have to communicate to your students which answers correspond to which numbers)
- Custom poll with custom choices (up to 5)
As soon as you click Start a poll, all students will be able to vote through clicking.
Click Publish polling results to end the poll and display the results for your students. The result will be displayed on the bottom right of your slide.
We recommend that you create a dedicated slide on which the poll question as well as all answer choices with their respective letters (max. A-E) are displayed.
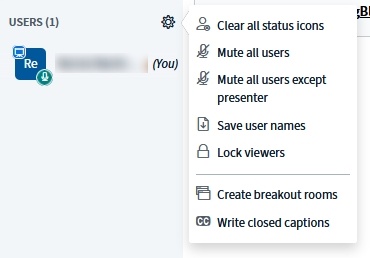
Editing participant permissions
You can edit the participant permissions on the left side of the screen. Next to the heading Users you can click the gear icon and select Lock viewers:

Details
| Function | Meaning |
|---|---|
| Share webcam | Here you can define whether students can share their webcam with others. The default setting is that students cannot share their webcam. |
| See other viewer webcams | Here you can define who can see shared webcams. The default setting is that only moderators can see shared webcams. |
| Share microphone | Here you can define whether students can decide to share their microphone. The default setting is that only moderators can decide to share microphones. |
| Send Public chat messages | Here you can define whether students can write messages in the public chat that can be read by all participants. The default setting is that all students can write messages in the public chat. |
| Send Private chat messages | Here you can define whether students can send private messages to participants who are visible to them. Click “See other users in the list of users” to define which participants can be seen by students. The default setting is that students can send private messages to all participants who are visible to them (in this case: only moderators). |
| Edit Shared Notes | Here you can define whether students can also create and edit notes. The default setting is that students cannot edit shared notes. |
| See other users in the Users list | Here you can define whether students can see other students in the list of users. The default setting is that only moderators can see all students. Students can only see themselves and all moderators. |
Please note, that users have to connect their audio again, if you have granted them the right to activate their microphone. Users must click on the button Leave audio  and another click on the button Join audio
 ![]() .
.
Session configuration
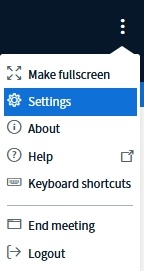
Click the button on the top right of your screen and select Settings.
Here you can edit several basic settings:
Ending a session
There are a few different ways to end a session, after which students can no longer open the session in BigBlueButton.
- After the scheduled duration has passed
- All moderators leave the virtual classroom
- Moderators manually end the session
To end the session, click ... on the top right of your screen and then select the option End meeting.
Part 3 - Follow-up in Moodle / Publishing recordings
Recorded presentation / webmeeting
If you have selected the instance type Room/Activity with recordings, you can make recordings in the BigBlueButton virtual classroom.
The recording will only be accessible to students after the session has ended.

Existing recordings can be played back by clicking Presentation.
You can edit the details of the recording at any time (i.e. name of the recording, description) and, if necessary, hide it manually (by clicking the eye icon on the right) or delete it (by clicking the recycle bin).
The button presentation will not be visible - also for teachers - as long as the activity is hidden.
To be able to play the recordings, you have to change the visibility briefly to be able to click on the button presentation (and hide it again afterwards).
FAQs
- What information do I have to give to students?
You can find instructions for students under BigBlueButton for students. - Can I record my session?
Yes, you can record a session at any time. - Who has the moderator permissions in BigBlueButton?
All roles in the Moodle course with editing permissions (i.e. teachers, tutors, clerical assistants). - Why can some of my students not hear me?
Please consult the troubleshooting tips on the information page for students. - Is it possible to join the session on a smartphone?
In general, it is possible to both lead and participate in sessions on a smartphone. However, your experience may be limited due to a reduced screen size and the weaker Internet connection of a phone. - Can I lead sessions on a tablet?
You should not experience any problems when leading sessions on a tablet. - Can students download annotations on the slides or whiteboard directly?
Unfortunately, this is not possible. For more information and links, please see Writing/Drawing on slides (whiteboard). - Students cannot access recordings, although they should be visible to them...
In some cases the view of the table for recordings is incomplete. E. g. as a teacher you are able to watch the recordings, but students can't. We are already working on fixing this.
CURRENT WORKAROUND:
- Go to the BBB activity in your moodle course.
- Do a right-click on the button presentation and choose the option Copy Link Location.
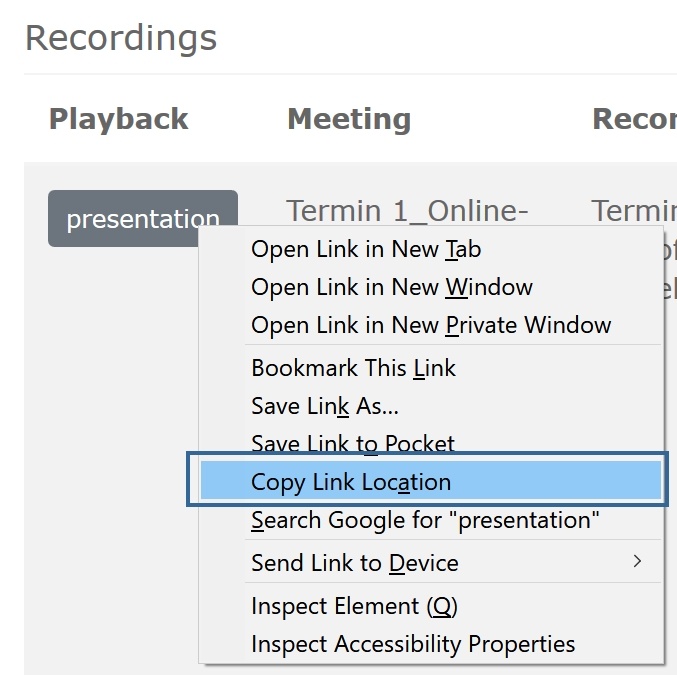
- Switch to the field Description in the settings of the BBB activity.
- Insert here a link manually (use
 ) and paste the copied link to the presentation out of your clipboard.
- I am not able to view a recording - I see a blank white screen when I click on "presentation"!
If you go to a BBB activity you will see the button "presentation" next to each available recording.
In the backend the video file will be loaded at the same time, which might not be finished immediately. This could happen especially with large recordings. In general wait a few seconds before clicking the button "presentation" or refreshing the site.