
BigBlueButtonAnchor Beschreibung Beschreibung  , accessible via Moodle, is an effective video conferencing tool for presentations, seminars and lectures. This tool allows you, for example, to share presentations with your students or start polls. Students can participate not only by using their microphone (audio) but also via a live-chat. It is also possible to allow additional people to participate by sending them an "external guest access link". The capacity for each meeting is around 300 participants.
...
To use BigBlueButton as part of your Moodle course, you first have to integrate it by selecting Add an activity or resource.


Configuration
| Anchor | ||||
|---|---|---|---|---|
|
...
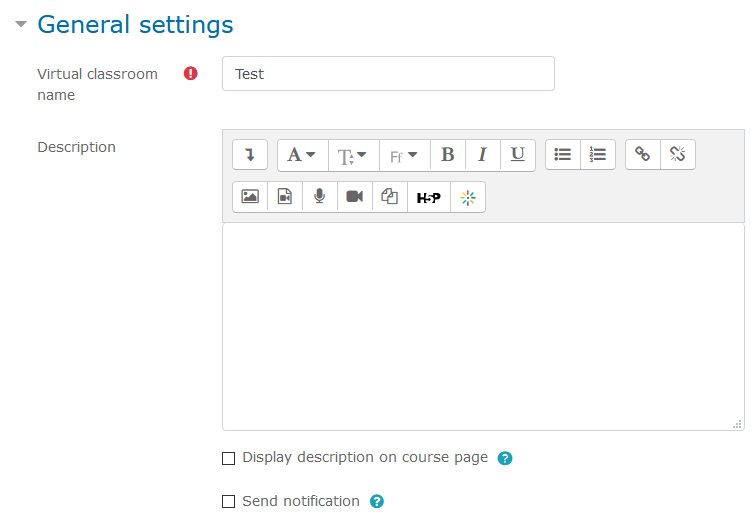
- add further information under Description. Tick Display description on course page, if you would like the description to be visible under the name of your room.

3.
| Anchor | ||||
|---|---|---|---|---|
|
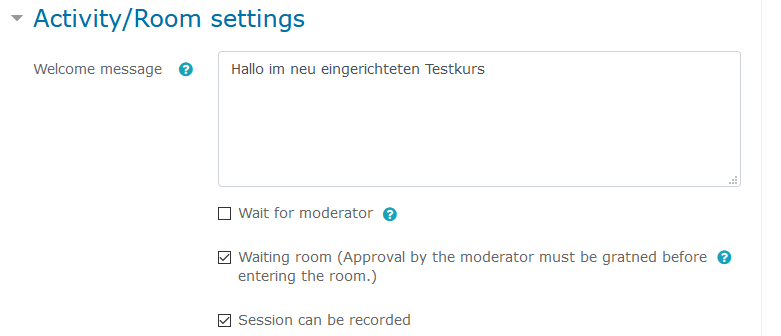
If you have chosen Room/Activity with recordings in the instance type settings above, you can authorize that the Session can be recorded.

| Anchor | ||||
|---|---|---|---|---|
|
...
You have to activate this function by choosing the checkbox Create guest access link for external participants.
...

Further settings need to be configured directly on the activity page of the session (further information: Using the external guest access link).
...
| Warning | ||
|---|---|---|
| ||
Uploaded files are automatically visible and downloadable for students in Moodle. If you do not want this, please upload the file directly in BigBlueButton (see Uploading a presentation). By doing so, you also have the option to upload further files or even during the session. |


6. In the section Participants you first have to define which Moodle course participants may join the session.
- All enrolled participants
- Participants with a specific Role in the course


Next, you can set what role they should be given during the session:
Moderator: has extensive permissions and leads the session (teachers, tutors)
Viewer: participates in the session and can be given more permissions by the moderator (students)
...

| Anchor | ||||
|---|---|---|---|---|
|
- Share webcam: let other participants see your webcam image
- See other viewers webcams: see webcam images of all other participants, not only moderators'
- Share microphone: make your audio available to others
- Send public chat messages: to chat with all other participants
- Send private chat messages: send private messages to other participants (sending messages to moderators is always possible)
- Edit shared notes: use the shared notes feature
- See other viewers in the users list: see the names of other participants in the session


| Tip |
|---|
These settings can be adjusted later during the session. Read here. |
...
| Note |
|---|
We recommend to always set both a start and end date so that server resources are available for other sessions. |


9. Further options to customise the activity can be found in the sections: Common module settings, Restrict access and Tags. These options include the availability of the activity on the course page and the group mode, for example.
| Warning | ||||||
|---|---|---|---|---|---|---|
Otherwise participants will join different rooms and will not see each other there! |


...
2. As a teacher here you will find the generated guest access link in the field "Invite Participants", which you can copy by using the button ![]() (on the right of the field).
(on the right of the field).

3. In area of "Access Code" further you can generate a password, which will then be required for logging into the session.
This access code needs to be generated manually by using the button ![]() (on the right of the field). With this button you can also generate a new one, if necessary.
(on the right of the field). With this button you can also generate a new one, if necessary.
Further you can copy the access code to your clipboard ![]() or delete it entirely
or delete it entirely ![]() , so that participants accessing the session via guest link don't need any access code to participate again.
, so that participants accessing the session via guest link don't need any access code to participate again.
...
- Automatically when the time period you specified under Schedule for session ends.
- Manually by clicking the End session button on the Moodle page of the session. This button will be displayed on the right-hand side of the “Join” button as soon as a session is started (see screenshot).

- You can also end a session from inside the session by clicking on the "End meeting" in the menu on the top right corner.

Part 2 - Using BigBlueButton
...
| Note | ||
|---|---|---|
| ||
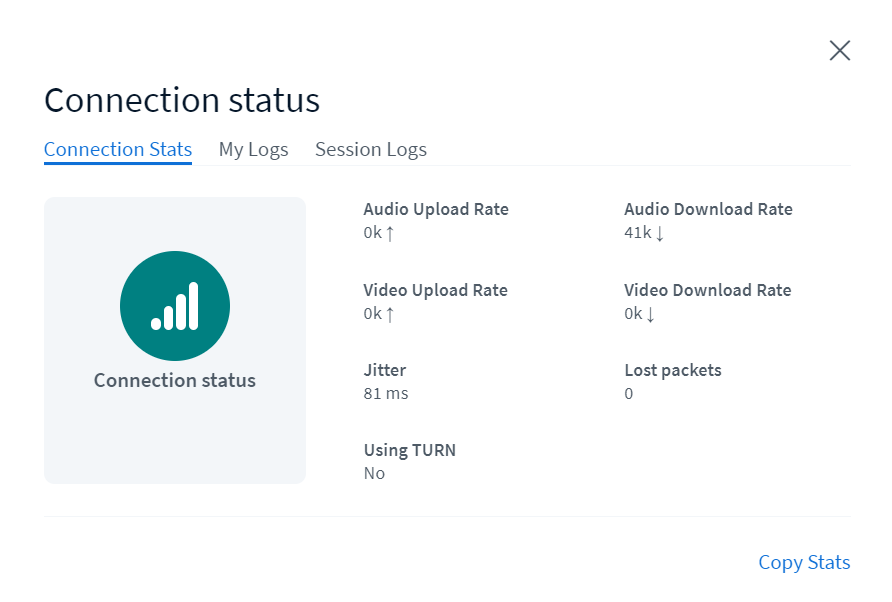
In the right upper corner you can view your connection status: green with good, violet with medium and red with bad connection.
There's also more information available if you click on the connection symbol
If your internet connection is unstable, you can switch on the data saving mode. In this mode, all webcam streams are switched off and only the presentation is shown. To activate the data saving mode:
|


...
| Warning |
|---|
Please be patient after ending the meeting. The video is rendered in the background and will be available to you a few minutes / several hours later (depending on server capacities and the length of the recording). |
The recording will only be accessible in the moodle activity page after the session has ended. You can edit the meta data of the recording when the recording is visible.
...
| Info |
|---|
External videos will not be part of a recording! |
| Anchor | ||||
|---|---|---|---|---|
|
You can find tools to interact with your slides with on the right-hand side in the middle.


Click the hand to change tools. The following tools are available:
...
Use the buttons below to undo the most recent action, clear all annotations and allow all participants to use the drawing tool.
| Warning | ||||||
|---|---|---|---|---|---|---|
|
...
Click Publish polling results to end the poll and display the results for your students. The result will be displayed on the bottom right of your slide.
| Info |
|---|
We recommend that you create a dedicated slide on which the poll question as well as all answer choices with their respective letters (max. A-E) are displayed. |
...
Moderators of BBB-sessions can create a breakout session by clicking the gear icon in the panel on the left and choosing the option Create breakout rooms.


A window appears, where you can select from the following settings:
- the number of the breakout rooms (2–8)
- the duration of the working phase in the breakout rooms
- whether participants will be allowed to choose by themselves, which room to join
- an option for an automatic random distribution of participants to rooms
- the possibility to assign rooms to participant by hand

| Info | ||
|---|---|---|
| ||
You can leave the field Duration empty if you are unsure, when to end the breakout sessions. To close the breakout rooms and redirect all participants back to the main room, please click on the option Breakout Rooms in the menu on the left and choose End all breakout rooms. As a moderator, you can also browse through the rooms and ask, whether more time is needed to finish the tasks in the breakout rooms. |
...
If moderators allowed participants to change rooms by themselves, they can also change the rooms by choosing Breakout rooms in the panel on the left. Moderators can also end the breakout sessions by clicking End all breakout rooms.

Anchor Berechtigungen Berechtigungen
Editing participant permissions
| Berechtigungen | |
| Berechtigungen |
...
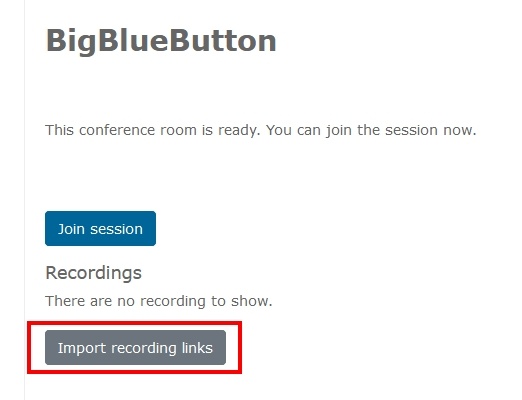
Switch to the new BigBlueButton activity and press the button Import recording links.
In the next step please choose the Moodle course (via the dropdown menu), where you want to link some recordings from.
All available recordings of the chosen course will be listed afterwards and you can choose the recordings you want to import by clicking the icon ![]() (Import) in the column Toolbar.
(Import) in the column Toolbar.
Please press the button Go back after importing, to check whether all the needed recordings were linked.
...
| Table of Contents | ||||
|---|---|---|---|---|
|
...
BigBlueButton Instructor Overview
| HTML |
|---|
<iframe width="560" height="315" src="https://www.youtube.com/embed/xeLOzKBUdIkEUeFmpkqtXc?si=h7tC6mTwHIymAoze" title="YouTube video player" frameborder="0" allow="accelerometer; autoplay; clipboard-write; encrypted-media; gyroscope; picture-in-picture; web-share" allowfullscreen></iframe> |
...
BigBlueButton Students Overview
| HTML |
|---|
<iframe width="560" height="315" src="https://www.youtube.com/embed/WZzvQiIS7mEEUeFmpkqtXc?si=6GjNRN68oNUDSDab" title="YouTube video player" frameborder="0" allow="accelerometer; autoplay; clipboard-write; encrypted-media; gyroscope; picture-in-picture; web-share" allowfullscreen></iframe> |
...
Using Webcames Tutorial
| HTML |
|---|
<iframe width="560" height="315" src="https://www.youtube.com/embed/xeLOzKBUdIk" title="YouTube video player" frameborder="0" allow="accelerometer; autoplay; clipboard-write; encrypted-media; gyroscope; picture-in-picture" allowfullscreen></iframe> |
Breaktout Rooms Tutorial
| HTML |
|---|
<iframe width="560" height="315" src="https://www.youtube.com/embed/WZzvQiIS7mE" title="YouTube video player" frameborder="0" allow="accelerometer; autoplay; clipboard-write; encrypted-media; gyroscope; picture-in-picture" allowfullscreen></iframe> |
Use Polling Tutorial
| HTML |
|---|
<iframe width="560" height="315" src="https://www.youtube.com/embed/3ogkbPrfm6o" title="YouTube video player" frameborder="0" allow="accelerometer; autoplay; clipboard-write; encrypted-media; gyroscope; picture-in-picture" allowfullscreen></iframe> |
...
| HTML |
|---|
<iframe width="560" height="315" src="https://www.youtube.com/embed/5IB47hPyoww" title="YouTube video player" frameborder="0" allow="accelerometer; autoplay; clipboard-write; encrypted-media; gyroscope; picture-in-picture" allowfullscreen></iframeiframe> |
Layout Manager Tutorial
| HTML |
|---|
<iframe width="560" height="315" src="https://www.youtube.com/embed/-SM_HTxVcx0" title="YouTube video player" frameborder="0" allow="accelerometer; autoplay; clipboard-write; encrypted-media; gyroscope; picture-in-picture" allowfullscreen></iframe> |
...