
Die Nutzung von BigBlueButtonAnchor Beschreibung Beschreibung  , accessible via Moodle bietet sich für Vorträge, wie Seminare oder Vorlesungen an. Damit können Sie beispielsweise Präsentationen freigeben oder Abstimmungen durchführen. Studierenden ist es im Chat oder via Audio möglich Feedback zu hinterlassen.
...
- Ergänzende Einstellungen in Moodle
- Aufzeichnung in BigBlueButton
- Veröffentlichen von Aufzeichnungen
- Zugriff der Aufnahmen für Studierende
| Note |
|---|
Bei Problemen mit der Bedienung, verwenden Sie bitte einen anderen Browser (es werden nicht alle Browser in vollem Umfang unterstützt). |
Inhalt
| Table of Contents |
|---|
| Info |
|---|
Die BigBlueButton-Aktivität dient der einmaligen Nutzung bzw. für den Zeitraum einer Online-Lehrveranstaltung. |
Teil 1 - Vorbereitung und Durchführung in Moodle
Anlegen
Um BigBlueButton in Ihrem Moodle-Kurs einbinden zu können, müssen Sie dieses über Material oder Aktivität anlegen hinzufügen.

Konfigurieren
...
Sie können zwischen drei Varianten wählen:
- Nur Räume/Aktivitäten: Basis-Nutzung der Online-Lehrveranstaltung mit Live-Präsentation (d. h. ohne Aufzeichnungs-Funktion)
- Raum / Aktivität mit Aufnahmen: Nutzung der Online-Lehrveranstaltung - parallel als Live-Präsentation zusätzlich mit Aufzeichnungen (Diese sind danach in Moodle für Studierende abrufbar.)
- Nur Aufzeichnungen: darüber können bereits vorhandene Aufnahmen angezeigt werden (diese Funktion wird aktuell nicht unterstützt)

...
2. Definieren Sie die Grundeinstellungen wie bei jeder Moodle-Aktivität:
- Vergeben Sie einen Namen unter Name des virtuellen Klassenraumes (Dieser wird im Moodle-Kurs als Link angezeigt).
- Fügen Sie im Bedarfsfall unter Beschreibung weitere Kurs-Informationen hinzu, welche Sie mit Beschreibung im Kurs zeigen anzeigen können.
- Zur Verständigung an Studierende über die Anlage neuer BigBlueButton-Aktivitäten, können Sie eine Erinnerung versenden.

3. Unter Aktivitäts/Raum-Einstellungen können Sie eine Begrüßungsnachricht definieren und festlegen, ob Studierende ohne Anwesenheit eine*r Moderator*in in der Online-Lehrveranstaltung dieser beitreten können. Wenn Sie diese Option aktivieren, sollten Sie einen Begrüßungstext für Studierende eintragen.

...
4. Unter Präsentationsinhalt können Sie eine Datei hinzufügen, die Sie als Präsentation in der Online-Lehrveranstaltung einsetzen können. Empfohlene Dateiformate sind Office-Dokumente (.ppt, .pptx, .odp etc.) sowie PDF-Dateien.
Möchten Sie Dateien während der Online-Lehrveranstaltung hochladen, können Sie dieses auch direkt im Klassenraum von BigBlueButton durchführen (siehe Hochladen einer Präsentation).
| Warning |
|---|
Hochgeladene Dateien sind für Studierende in Moodle automatisch sichtbar. Sollten Sie dieses nicht wünschen, wählen Sie bitte den Weg direkt über BigBlueButton (siehe Hochladen einer Präsentation). |
 o
o
5. Im Abschnitt Teilnehmer*innen definieren Sie im ersten Schritt, welche Teilnehmer*innen des Moodle-Kurses an der Online-Lehrveranstaltung teilnehmen können.
...
Im nächsten Schritt definieren Sie, welche Funktion diese in der Online-Lehrveranstaltung haben.
Moderator/in: hat umfangreiche Rechte und leitet die Online-Lehrveranstaltung (Lehrende, Tutor*innen)
Zuschauer/in: ist Teilnehmer*in an der Online-Lehrveranstaltung und kann durch Moderator*innen weitere Rechte erhalten (Studierende)

...
| Note |
|---|
Wir empfehlen immer beide Zeitpunkte zu definieren, damit die Serverressourcen für andere Termine wieder zur Verfügung stehen. |

7. In den folgenden Abschnitten Weitere Einstellungen, Voraussetzungen und Tags können weitere Optionen der Aktivität definiert werden. Dies sind z. B. Verfügbarkeit der Aktivität auf der Kurs-Startseite und Gruppenmodus.
8. Speichern Sie die Eingaben und kehren auf die Kurs-Startseite zurück.

Zugriff auf den Klassenraum der Online-Lehrveranstaltung
1. Klicken Sie auf der Kurs-Startseite auf die eingerichtete Aktivität (den Termin Ihrer Online-Lehrveranstaltung).
2. Innerhalb des in den Einstellungen unter Zeitplan definierten Zeitraums sehen Sie als Moderator*in/ sowie Zuschauer*innen die Schaltfläche Teilnehmen, wodurch Sie auf den Klassenraum zugreifen können.
Außerhalb dieses Zeitraums sehen weder Sie, noch die übrigen Zuschauer*innen, diese Schaltfläche.

...
, is an effective video conferencing tool for presentations, seminars and lectures. This tool allows you, for example, to share presentations with your students or start polls. Students can participate not only by using their microphone (audio) but also via a live-chat. It is also possible to allow additional people to participate by sending them an "external guest access link". The capacity for each meeting is around 300 participants.
Contents
| Table of Contents | ||
|---|---|---|
|
Part 1 - Preparation and implementation in Moodle
Adding a session
To use BigBlueButton as part of your Moodle course, you first have to integrate it by selecting Add an activity or resource.

Configuration
| Anchor | ||||
|---|---|---|---|---|
|
You can choose between three options:
- Room/Activity only: basic use of the session in your Moodle course with a live presentation and a link to join it.
- Room/Activity with recordings: in additon to your live presentation you have the option of recordings which you can create during your session, but you can also display links to already existing recordings.
- Recordings only: only links to already existing recordings can be displayed.
| Note | ||
|---|---|---|
| ||
If you like to do a recording of your session, make sure that there is a tick in the box "Session can be recorded" further down in the Activity/room settings. The recording function itself can be startet directy in BigBlueButton when you have started your session (see below). |
2. Start by defining your General settings, like in every other Moodle-activity:
- Give your virtual room a name in Virtual classroom name (which will be displayed as a link in your Moodle-course).
- To notify e.g. students of a new BigBlueButton session, enable the option Send notification.
after klicking on Show more, you can also:
- add further information under Description. Tick Display description on course page, if you would like the description to be visible under the name of your room.

3.
| Anchor | ||||
|---|---|---|---|---|
|
If you have chosen Room/Activity with recordings in the instance type settings above, you can authorize that the Session can be recorded.

| Anchor | ||||
|---|---|---|---|---|
|
If the option Waiting room is enabled, the moderator will get a message to inform him that somebody wants to join the session and he can then authorize their access.
A person who joined your session will then see:

And a moderator:
4.
In the section External guest access link you can allow external people (who have no active u:account) to participate in your BigBlueButton session.Anchor bbb_gastlink bbb_gastlink
You have to activate this function by choosing the checkbox Create guest access link for external participants.

Further settings need to be configured directly on the activity page of the session (further information: Using the external guest access link).
| Anchor | ||||
|---|---|---|---|---|
|
5. In Presentation content you can add one file (number of files is limited) that you can use as a presentation during the session. File formats which can be used are Office documents (.ppt, .pptx, .odp etc.), but we recommend to prefer PDF files.
| Warning | ||
|---|---|---|
| ||
Uploaded files are automatically visible and downloadable for students in Moodle. If you do not want this, please upload the file directly in BigBlueButton (see Uploading a presentation). By doing so, you also have the option to upload further files or even during the session. |

6. In the section Participants you first have to define which Moodle course participants may join the session.
- All enrolled participants
- Participants with a specific Role in the course


Next, you can set what role they should be given during the session:
Moderator: has extensive permissions and leads the session (teachers, tutors)
Viewer: participates in the session and can be given more permissions by the moderator (students)

| Anchor | ||||
|---|---|---|---|---|
|
- Share webcam: let other participants see your webcam image
- See other viewers webcams: see webcam images of all other participants, not only moderators'
- Share microphone: make your audio available to others
- Send public chat messages: to chat with all other participants
- Send private chat messages: send private messages to other participants (sending messages to moderators is always possible)
- Edit shared notes: use the shared notes feature
- See other viewers in the users list: see the names of other participants in the session

| Tip |
|---|
These settings can be adjusted later during the session. Read here. |
| Anchor | ||||
|---|---|---|---|---|
|
| Note |
|---|
We recommend to always set both a start and end date so that server resources are available for other sessions. |

9. Further options to customise the activity can be found in the sections: Common module settings, Restrict access and Tags. These options include the availability of the activity on the course page and the group mode, for example.
| Warning | ||||||
|---|---|---|---|---|---|---|
Otherwise participants will join different rooms and will not see each other there! |

9. Save your settings and return to the course page.
![]()
Accessing the virtual classroom
1. Open a BigBlueButton-activity on the course page .
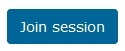
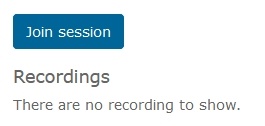
2. Within the time period you specified under Schedule for session, the option Join session will appear, that both the moderator and the viewers can see. Click this button to join the session.
This button will not be visible to the moderator or the viewers outside of the specified time period.
If you ticked the box in Activity/Room settings that allows viewers to join the session before the moderator enters the session, the button will be displayed. However, viewers cannot access BigBlueButton until the moderator is present.
| Warning | ||
|---|---|---|
| ||
Please have only one browser tab or window open, when clicking Join session as it may occur that the session will not be assigned to the right activity. |
| Anchor | ||||
|---|---|---|---|---|
|
If you have activated the option to use the external guest access link (within the BigBlueButton activity settings), persons without a u:account can also access your session.
They will be redirected to an invitation page, where they can login to the session.

For configuring the external guest access link please do the following steps:
1. Click the new activity you created on the course page (the date of the session).
2. As a teacher here you will find the generated guest access link in the field "Invite Participants", which you can copy by using the button ![]() (on the right of the field).
(on the right of the field).

3. In area of "Access Code" further you can generate a password, which will then be required for logging into the session.
This access code needs to be generated manually by using the button ![]() (on the right of the field). With this button you can also generate a new one, if necessary.
(on the right of the field). With this button you can also generate a new one, if necessary.
Further you can copy the access code to your clipboard ![]() or delete it entirely
or delete it entirely ![]() , so that participants accessing the session via guest link don't need any access code to participate again.
, so that participants accessing the session via guest link don't need any access code to participate again.
Ending a session
There are three ways to end a session:
- Automatically when the time period you specified under Schedule for session ends.
- Manually by clicking the End session button on the Moodle page of the session. This button will be displayed on the right-hand side of the “Join” button as soon as a session is started (see screenshot).

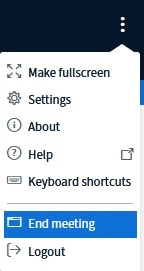
- You can also end a session from inside the session by clicking on the "End meeting" in the menu on the top right corner.

Part 2 - Using BigBlueButton
| Warning |
|---|
By default, BigBlueButton is displayed in the language you selected for your web browser. You can change this setting manually any time by clicking on Settings. |
| Anchor | ||||
|---|---|---|---|---|
|
| Warning |
|---|
You have to pass all of the following steps to set up your audio successfully. |
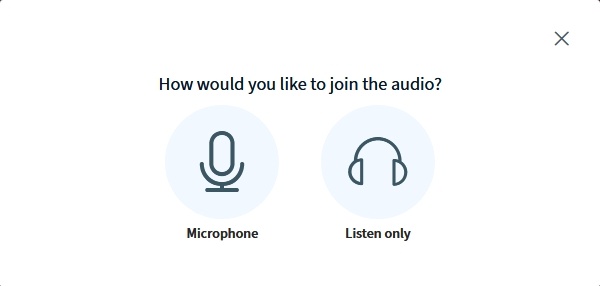
At the beginning you will be asked if you would like to participate in the session with a microphone or to listen only.
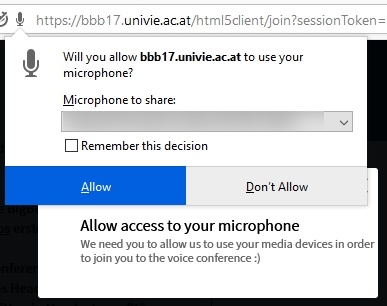
As a teacher you most probably choose the option "Microphone". In the following step you will be asked by your web browser to allow BigBlueButton to use your microphone (the view of the message can vary with different browser).
Then an echo test is started, where you can check whether your audio is working and configured correctly or not (it may take some time to load):

If you hear an echo of your audio, please choose the button "Yes". Your audio is now working properly.
If not, please choose the button "No". Then you can choose a different audio device from your computer and do a rerun of the echo test.
| Note | ||
|---|---|---|
| ||
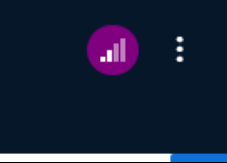
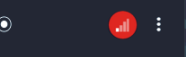
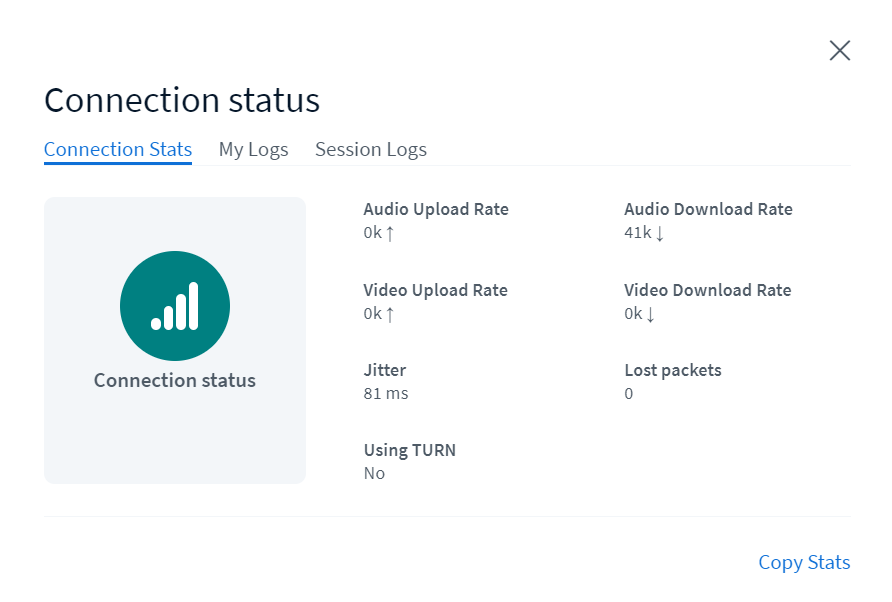
In the right upper corner you can view your connection status: green with good, violet with medium and red with bad connection.
There's also more information available if you click on the connection symbol
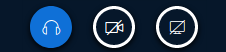
If your internet connection is unstable, you can switch on the data saving mode. In this mode, all webcam streams are switched off and only the presentation is shown. To activate the data saving mode:
|


Functions
You can use the following functions to customise the session:
- Uploading presentations in different file formats
- Recording sessions
- Creating and editing notes (also by students if needed)
- Sharing audio, webcam and/or screen
- Chat feature, both private and public
- Sharing videos
- Writing/drawing on uploaded slides (Whiteboard function)
- Polls with a maximum of 5 answer choices
Dividing student groups across breakout rooms for short group projects (up to 8 groups) - instructions will follow
You can find information about editing the permissions of participating students under Editing participant permissions.
| Anchor | ||||
|---|---|---|---|---|
|
You can upload a presentation when creating the activity. If you have not done so, you can do it also during a running session.
Click the plus icon in the default presentation. 
Most presentation formats (.ppt, .pptx, .odp, etc.) are supported as well as PDF files.
| Info |
|---|
Please have a look at the further information in our FAQs concerning the use of links and animations within your files! |
| Anchor | ||||
|---|---|---|---|---|
|
If you selected in the settings the instance type Room/Activity with recordings, you can record your session in the BigBlueButton virtual classroom. The recording includes audio, video, presentations or your desktop screen.
Using this option allows you to record the session and make it accessible to students afterwards. This is especially useful for large courses, since the maximum number of session participants is 300.
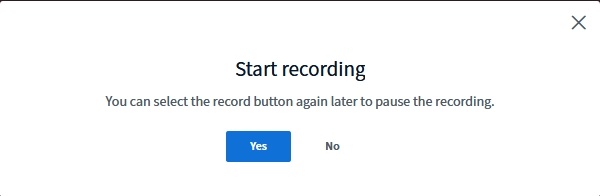
To start a recording, click the Start recording button above the presentation area. Confirm that you want to start the recording by clicking Yes in the dialog window.

The recording starts immediately but can be paused at any time by clicking the button again. To continue the recording, click Resume recording. The recording will be ended and saved automatically as soon as you select End meeting. It is not necessary for you to do anything else.
| Warning |
|---|
Please be patient after ending the meeting. The video is rendered in the background and will be available to you a few minutes / several hours later (depending on server capacities and the length of the recording). |
The recording will only be accessible in the moodle activity page after the session has ended. You can edit the meta data of the recording when the recording is visible.

| Tip | ||
|---|---|---|
| ||
To make in your session a recording only without students present (cf. Screencast, ...), you can hide the activity after adding it to Moodle and change the visibility again when your recording is ready. note: The button presentation for playing the recording will not be visible – also for teachers – as long as the activity is hidden. |
| Anchor | ||||
|---|---|---|---|---|
|
You can open a shared notepad by clicking Shared Notes above the list of participants on the left-hand side of the screen. It will be displayed on the right to this list, instead of the chat.
| Warning |
|---|
The notes of the shared notepad will not be saved. If you want to keep your notes after the end of the session, you can download them by clicking the button on the right-hand side. |
The upper toolbar offers some functions with which you can highlight and edit the text:
![]()
- Bold
- Italic
- Underline
- Strikethrough
- Ordered list
- Unordered list
- Undo most recent action
- Redo most recently undone action
- Export all notes as file
| Anchor | ||||
|---|---|---|---|---|
|
You can decide to share audio and video via the bar at the bottom in the middle of your screen:
- Click the left button to restore your default settings. If you accidentally chose the wrong settings when entering the virtual classroom, you can rectify that here.
- Click the middle button to turn your webcam on and off.
- Click the right button to start or stop sharing your screen.
Info You can share the entire screen, single windows or tabs of the current browser or a specific window of an opened application (according to the used browser).
It is only possible to share only windows of applications which are currently in the front of the window/ tab of the browser, where you want to start the screen sharing (> the window/ tab where the videoconference tool has been opened).
Application windows which are minimised or in the back of the window/ tab of the browser, where the session of videoconference tool is running, won't be shown in the list of available windows.
| Anchor | ||||
|---|---|---|---|---|
|
You can communicate with all students through public chat or with individual users through private chat.
Click on the person you want to chat with in the bar on the left. For every new message you receive you will see the number of unread messages as white number displayed on a red background.
| Anchor | ||||
|---|---|---|---|---|
|
Click the plus button on the bottom left and select Share an external video to share videos from external video providers.
The following providers are supported:
- Youtube
- Vimeo
- Instructure Media
- Twitch
- Daily Motion
- any audio or video file, available to all participants on the internet, which has one of the following file-extensions: *.mp3, *.wav, *.ogg, *.mp4 or *.mov. These can be files uploaded to Moodle. Files in the u:cloud are currently not supported.
| Info |
|---|
External videos will not be part of a recording! |
| Anchor | ||||
|---|---|---|---|---|
|
You can find tools to interact with your slides with on the right-hand side in the middle.

Click the hand to change tools. The following tools are available:
- Hand: All students see a dot on the slides where your cursor is (similar to a laser pointer).
- Line, triangle, ellipse, rectangle: Draw the respective geometric shape on the slides. Hold down the mouse button to draw.
- Pencil: Directly draw any shape with a pencil.
Use the buttons below to undo the most recent action, clear all annotations and allow all participants to use the drawing tool.
| Warning | ||||||
|---|---|---|---|---|---|---|
|
| Anchor | ||||
|---|---|---|---|---|
|
You can get feedback from your students by using the polling tool.
To create a poll, click the plus button on the bottom left: Then click Start a poll.
There are different types of polls you can choose from:
- Yes/No Choices
- 2–5 answer choices indicated by the letters A–E (you would have to communicate to your students which answers correspond to which letters)
- Custom poll with custom choices (up to 5)
As soon as you click Start a poll, all students will be able to vote through clicking.
Click Publish polling results to end the poll and display the results for your students. The result will be displayed on the bottom right of your slide.
| Info |
|---|
We recommend that you create a dedicated slide on which the poll question as well as all answer choices with their respective letters (max. A-E) are displayed. |
| Anchor | ||||
|---|---|---|---|---|
|
During your session you can split the participant group into sub-groups for discussions in so called breakout rooms. Several session rooms are opened next to the main room, where two or more participants can discuss an assignment via audio, video or chat. After a predefined time span all participants are automatically redirected back to the main room.
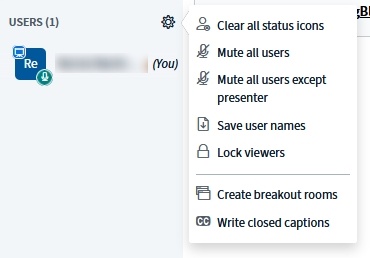
Moderators of BBB-sessions can create a breakout session by clicking the gear icon in the panel on the left and choosing the option Create breakout rooms.

A window appears, where you can select from the following settings:
- the number of the breakout rooms (2–8)
- the duration of the working phase in the breakout rooms
- whether participants will be allowed to choose by themselves, which room to join
- an option for an automatic random distribution of participants to rooms
- the possibility to assign rooms to participant by hand

| Info | ||
|---|---|---|
| ||
You can leave the field Duration empty if you are unsure, when to end the breakout sessions. To close the breakout rooms and redirect all participants back to the main room, please click on the option Breakout Rooms in the menu on the left and choose End all breakout rooms. As a moderator, you can also browse through the rooms and ask, whether more time is needed to finish the tasks in the breakout rooms. |
When your setup is ready, click Create. Participants who were assigned to a breakout room are asked, whether they want to enter the breakout session. To end the breakout session, they can choose Logout in the menu in the upper right corner to get back into the main room.
If moderators allowed participants to change rooms by themselves, they can also change the rooms by choosing Breakout rooms in the panel on the left. Moderators can also end the breakout sessions by clicking End all breakout rooms.

Anchor Berechtigungen Berechtigungen
Editing participant permissions
| Berechtigungen | |
| Berechtigungen |
You can control, what participants will be able to do during a session on the left side of the screen. Next to the heading Users you can click the gear icon and select Lock viewers:

Details
| Function | Meaning | ||
|---|---|---|---|
| Share webcam | Here you can define whether students can share their webcam with others. The default setting is that students cannot share their webcam.
| ||
| See other viewer webcams | Here you can define, whether students will be seeing other student's webcams or if just moderators can see them. The default setting is that only moderators can see shared webcams. | ||
| Share microphone | Here you can allow students to share their microphone. The default setting is that only moderators can decide to share microphones. | ||
| Send Public chat messages | Here you can define whether students can write messages in the public chat that can be read by all participants. The default setting is that all students can write messages in the public chat. | ||
| Send Private chat messages | Here you can define whether students can send private messages to participants who are visible to them. Click “See other users in the list of users” below to make students see the names of all other participants. If this option is unchecked, private messages to moderators will still be possible. The default setting is that students can send private messages to all participants who are visible to them (with default settings: only moderators). | ||
| Edit Shared Notes | Here you can define whether students can create and edit notes in the shared notepad. The default setting is that students cannot edit shared notes. | ||
| See other users in the Users list | Here you can define whether students can see other students in the list of users. The default setting is that only moderators can see all students. Students can only see themselves and all moderators. |
| Info |
|---|
Please note, that users have to reconnect audio, if you have granted them the right to activate their microphone. Users must click on the button Leave audio |
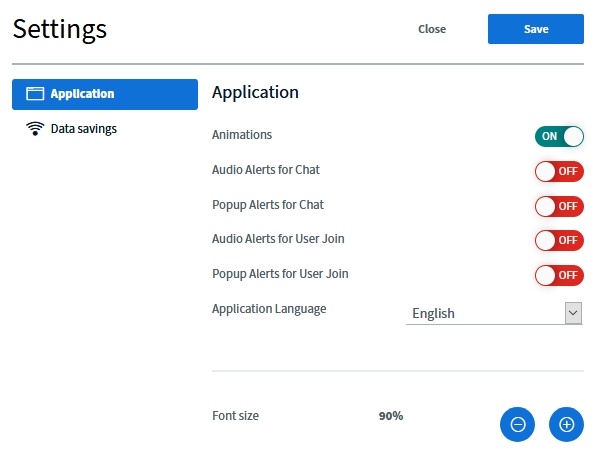
Session configurationAnchor Einstellungen Einstellungen
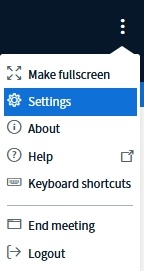
Click the button on the top right of your screen and select Settings.
Here you can edit several basic settings:
| Anchor | ||||
|---|---|---|---|---|
|
There are several ways to end a session, so students will no longer be able to enter it.
- After the scheduled duration has passed
- When all moderators have left the virtual classroom
- A moderators ended the session manually
| Anchor | ||||
|---|---|---|---|---|
|
| Anchor | ||||
|---|---|---|---|---|
|
Recorded presentation / webmeeting
If you have selected the instance type Room/Activity with recordings, you can make recordings in the BigBlueButton virtual classroom.
The recording will be made accessible to students a short time after the session has ended.

| Warning |
|---|
| It can take a few minutes / several hours for the audio and video recordings to be fully rendered (depending on server capacities and the length of the recording). They are only available in Moodle after the session has ended. |
Existing recordings can be played back by clicking Presentation.
You can edit the details of the recording at any time (i.e. name of the recording, description) and, if necessary, hide it manually (by clicking the eye icon on the right) or delete it (by clicking the recycle bin).
| Warning |
|---|
The button presentation will not be visible – also for teachers – as long as the activity is hidden. |
| Anchor | ||||
|---|---|---|---|---|
|
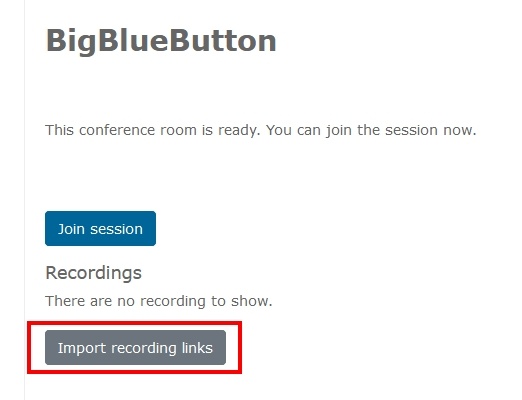
If you want to reuse existing recordings of BigBlueButton in another Moodle course, you can link them to another BBB-activity in that new course.
In the first step you have to add a new BigBlueButton activity in the course where you want to use the recordings or import the whole activity using the function import (description German only).
Switch to the new BigBlueButton activity and press the button Import recording links.
In the next step please choose the Moodle course (via the dropdown menu), where you want to link some recordings from.
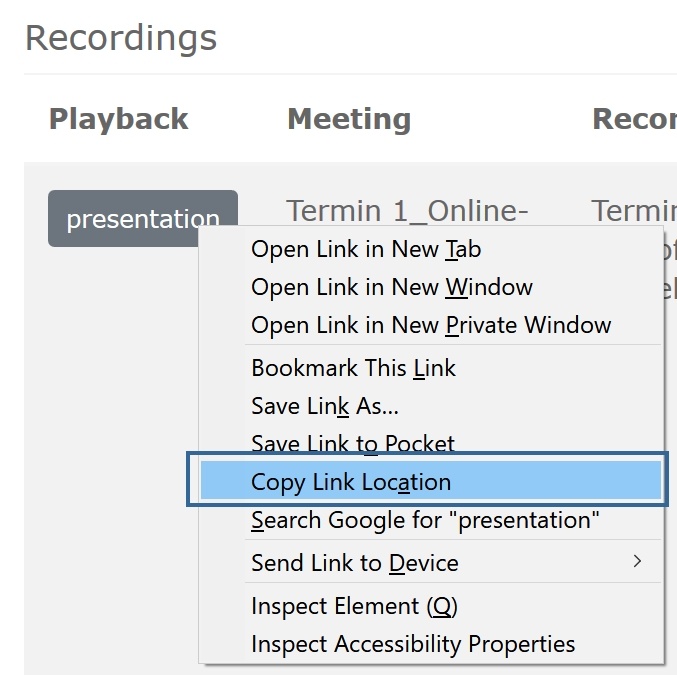
All available recordings of the chosen course will be listed afterwards and you can choose the recordings you want to import by clicking the icon ![]() (Import) in the column Toolbar.
(Import) in the column Toolbar.
Please press the button Go back after importing, to check whether all the needed recordings were linked.

| Anchor | ||||
|---|---|---|---|---|
|
| Expand | ||||||
|---|---|---|---|---|---|---|
| ||||||
CURRENT WORKAROUND:
|

Video Tutorials
| Table of Contents | ||||
|---|---|---|---|---|
|
...
BigBlueButton Instructor Overview
| HTML |
|---|
<iframe width="560" height="315" src="https://www.youtube.com/embed/EUeFmpkqtXc?si=h7tC6mTwHIymAoze" title="YouTube video player" frameborder="0" allow="accelerometer; autoplay; clipboard-write; encrypted-media; gyroscope; picture-in-picture; web-share" allowfullscreen></iframe> |
BigBlueButton Students Overview
| HTML |
|---|
<iframe width="560" height="315" src="https://www.youtube.com/embed/EUeFmpkqtXc?si=6GjNRN68oNUDSDab" title="YouTube video player" frameborder="0" allow="accelerometer; autoplay; clipboard-write; encrypted-media; gyroscope; picture-in-picture; web-share" allowfullscreen></iframe> |
Using Webcames Tutorial
| HTML |
|---|
<iframe width="560" height="315" src="https://www.youtube.com/embed/xeLOzKBUdIk" title="YouTube video player" frameborder="0" allow="accelerometer; autoplay; clipboard-write; encrypted-media; gyroscope; picture-in-picture" allowfullscreen></iframe> |
Breaktout Rooms Tutorial
| HTML |
|---|
<iframe width="560" height="315" src="https://www.youtube.com/embed/WZzvQiIS7mE" title="YouTube video player" frameborder="0" allow="accelerometer; autoplay; clipboard-write; encrypted-media; gyroscope; picture-in-picture" allowfullscreen></iframe> |
Use Polling Tutorial
| HTML |
|---|
<iframe width="560" height="315" src="https://www.youtube.com/embed/3ogkbPrfm6o" title="YouTube video player" frameborder="0" allow="accelerometer; autoplay; clipboard-write; encrypted-media; gyroscope; picture-in-picture" allowfullscreen></iframe> |
Shared Notes Tutorial
| HTML |
|---|
<iframe width="560" height="315" src="https://www.youtube.com/embed/8_hiTlmX1Wo" title="YouTube video player" frameborder="0" allow="accelerometer; autoplay; clipboard-write; encrypted-media; gyroscope; picture-in-picture" allowfullscreen></iframe>
|
Multi-User Whiteboard Tutorial
| HTML |
|---|
<iframe width="560" height="315" src="https://www.youtube.com/embed/WyFugMxAup4" title="YouTube video player" frameborder="0" allow="accelerometer; autoplay; clipboard-write; encrypted-media; gyroscope; picture-in-picture" allowfullscreen></iframe> |
Sharing External Video Tutorial
| HTML |
|---|
<iframe width="560" height="315" src="https://www.youtube.com/embed/5IB47hPyoww" title="YouTube video player" frameborder="0" allow="accelerometer; autoplay; clipboard-write; encrypted-media; gyroscope; picture-in-picture" allowfullscreen></iframe>
|
Layout Manager Tutorial
| HTML |
|---|
<iframe width="560" height="315" src="https://www.youtube.com/embed/-SM_HTxVcx0" title="YouTube video player" frameborder="0" allow="accelerometer; autoplay; clipboard-write; encrypted-media; gyroscope; picture-in-picture" allowfullscreen></iframe> |
Beenden der Online-Lehrveranstaltung
Um den Termin zu beenden, gibt es zwei Möglichkeiten:
1. Automatisch durch Überschreiten des Endzeitpunkts, der unter Kopie von BigBlueButton für Lehrende#Zeitplan definiert wurde.
2. Manuell durch Klicken auf die Schaltfläche Meeting beenden. Diese wird nachdem Sie in Moodle über die Schaltfläche "Teilnehmen" die Online-Lehrveranstaltung gestartet haben, direkt rechts davon angezeigt (siehe Screenshot).
Teil 2 - Einsatz von BigBlueButton
...
Zu Beginn werden Sie gefragt, ob Sie mit Mikrofon beitreten oder nur zuhören wollen.

In BigBlueButton haben Sie folgende Funktionen, um Ihre Online-Vorlesung zu gestalten:
- Hochladen von Präsentationen in verschiedenen Dateiformaten
- Aufzeichnen von Online-Lehrveranstaltungen
- Erstellen und bearbeiten von Notizen (nach Wunsch auch durch Studierende)
- Teilen Ihres Mikrofons, Ihrer Webcam und/oder Bildschirms
- Chat-Funktion, sowohl privat als auch mit allen Nutzer*innen
- Abspielen von Videos
- Schreiben/Malen auf ihren hochgeladenen Folien (Whiteboard-Funktion)
- Umfragen mit maximal 5 Auswahlmöglichkeiten
- Aufteilen von Studierenden in Breakout-Räume für kurze Gruppenaufgaben (maximal 8 Gruppen) - Anleitung folgt
Eine Information um die Berechtigungen von teilnehmenden Studierenden anzupassen, finden Sie unter Konfiguration der Teilnehmer*innen-Rechte.
...
Sie können bei der Erstellung der Aktivität bereits eine Präsentation hochladen. Wenn Sie dieses noch nicht getan haben, können Sie es hier nachholen.
Klicken Sie bei der Standardpräsentation auf das Plus-Symbol.
Es werden Office-Dokumente (.ppt, .pptx, .odp etc.) sowie PDF-Dateien unterstützt.
...
Sofern Sie bei den Einstellungen in Moodle den Instanztyp Raum / Aktivität mit Aufnahmen oder Nur Aufzeichnungen ausgewählt haben, können Sie im Klassenraum von BigBlueButton eine Aufzeichnung durchführen. Wenn Sie gleichzeitig Ihr Mikrofon aktiv haben, können Sie dadurch eine Audio- und Video-Aufzeichnung erstellen.
Diese Option ermöglicht es Ihnen, einen Mitschnitt der Lehrveranstaltung den Studierenden später in Moodle zur Verfügung zu stellen. Dies ist besonders bei großen Lehrveranstaltungen sinnvoll, da die Teilnehmer*innen-Anzahl auf 100 Studierende beschränkt ist.
Hierbei sehen Sie oberhalb des Präsentations-Bereichs die Schaltfläche Aufzeichnung starten zur Auswahl. Bestätigen Sie im Dialog-Fenster mit Ja.


...
| Warning |
|---|
Haben Sie nach Beendigung des Meetings noch etwas Geduld, das Video wird im Hintergrund gerendert und steht je nach aktuellen Server-Kapazitäten bzw. Länge der Aufnahme erst nach einigen Minuten zur Verfügung. |
Die Aufzeichnung steht Studierenden nicht während, sondern erst nach Ende der Lehrveranstaltung zur Verfügung. Diese können im Anschluss von Ihnen noch eingeschränkt bearbeitet werden.


...
| Warning |
|---|
Diese Notizen werden nicht gespeichert! Sollten Sie die Notizen am Ende der Online-Vorlesung aufbewahren wollen, können Sie diese mit dem Button ganz rechts, herunterladen. |
In der oberen Leiste haben Sie mehrere Möglichkeiten, den eingegebenen Text hervorzuheben bzw. diesen zu bearbeiten:

- Fett
- Kursiv
- Unterstrichen
- durchgestrichen
- Aufzählung mit Nummern
- Aufzählung mit Punkten
- Letzte Änderung Rückgängig machen
- Letzte rückgängig gemachte Änderung wiederherstellen
- Gesamte Notizen als Datei exportieren
...
Das Teilen von Audio/Video funktioniert über die Leiste unten in der Mitte:
- Mit Klick auf den linken Button kommen Sie zurück in die ursprünglichen Einstellungen. Sollten Sie sich beim Eintritt in den virtuellen Klassenraum geirrt haben, können Sie dies hier korrigieren.
- Mit Klick auf den mittleren Button können Sie Ihre Webcam ein- und ausschalten.
- Mit Klick auf den rechten Button können Sie Ihren Bildschirm freigeben oder die Freigabe beenden.
...
Sie können mit Studierenden im öffentlichen Chat oder mit einzelnen Personen im Einzelchat kommunizieren.
Dazu klicken Sie in der linken Leiste auf die Person, mit der Sie chatten wollen. Bei jeder neuen Nachricht, erhalten Sie eine weiße Zahl auf rotem Grund.
...
Mittels Plus-Button unten links und externes Video teilen können Sie Videos von externen Video-Diensten anbieten.
Es werden folgende Dienste unterstützt:
- Youtube
- Vimeo
- Instructure Media
- Twitch
- Daily Motion
...
Ganz rechts in der Mitte finden Sie weitere Möglichkeiten, um mit Ihren Folien zu interagieren.
Bei Klick auf die Hand können Sie das Werkzeug wechseln. Folgende Werkzeuge stehen Ihnen zur Verfügung:
- Hand: Zeigen eines Punktes für alle Studierenden, wo sich Ihr Mauszeiger auf den Folien befindet (ähnlich einem Laserpointer).
- Linie, Dreieck, Ellipse, Rechteck: Zeichnen Sie die entsprechende Geometrische Form auf die Folien. Zum Zeichnen müssen sie den Mauszeiger gedrückt halten.
- Stift: Direkt malen beliebiger Formen mit einem Stift.
Die Knöpfe darunter dienen dem Rückgängig machen der letzten Aktion, dem Löschen aller Anmerkungen und dem Freigeben der Malfunktion für alle Teilnehmer*innen.
...
Sie können Ihren Studierenden jeweils eine Frage als Umfrage stellen.
Dazu klicken Sie wieder auf den Plus-Button unten links: und danach auf Umfrage starten.
Sie haben hier mehrere Arten der Umfrage zur Auswahl:
- Ja/Nein-Frage
- 2-5 durch Buchstaben angegebene Antwortmöglichkeiten, die Sie z. B. mündlich durchgeben können
- Eigene Umfrage mit eigenen Auswahlmöglichkeiten (maximal 5)
Sobald Sie Umfrage starten aktivieren, können alle Studierenden per Klick abstimmen.
Mit einem Klick auf Umfrageergebnisse veröffentlichen, können Sie die Umfrage beenden und den Studierenden die Ergebnisse anzeigen. Das Ergebnis wird auf der Folie rechts unten angezeigt.
| Info |
|---|
Gestalten Sie eine Folie, in welcher die Frage sowie die Antwortmöglichkeiten mit Buchstaben (max. A-E) angezeigt werden. |
...
Sie können die Rechte der Teilnehmer*innen links im Bildschirm, bei der Überschrift Teilnehmer*innenliste über Klick auf das Zahnrad-Symbol und Klick auf Zuschauerrechte einschränken anpassen:


Beschreibung
...
Hier können Sie einstellen, ob Studierende ihre Webcam mit anderen teilen können.
Standardmäßig können Studierende ihre Webcam nicht teilen.
...
Hier können Sie einstellen, wer freigegebene Webcams sehen kann.
Standardmäßig können nur Moderator*innen freigegebene Webcams sehen.
...
Hier können Sie einstellen, ob Studierende ihr eigenes Mikrofon freigeben können
Standardmäßig können nur Moderator*innen ihr Mikrofon freigeben.
...
Hier können Sie einstellen, ob Studierende im öffentlichen Chat Nachrichten schreiben können, die von allen Teilnehmer*innen gelesen werden können.
Standardmäßig können alle Studierenden im öffentlichen Chat Nachrichten schreiben.
...
Hier können Sie einstellen, ob Studierende private Nachrichten an für sie sichtbare Teilnehmer*innen schicken können. Welche Teilnehmer*innen Studierende sehen, können sie mit dem Schalter "Andere Teilnehmer in der Teilnehmerliste sehen"
Standardmäßig können Studierende private Nachrichten an alle sichtbaren Teilnehmer*innen (hier: nur Moderator*innen) schicken.
...
Hier können Sie ändern, ob Notizen auch von Studierenden angelegt und bearbeitet werden können.
Standardmäßig können Studierende geteilte Notizen nicht bearbeiten.
...
Hier können Sie einstellen, ob Studierende andere Studierende in der Teilnehmer*innen-Liste sehen können.
Standardmäßig können nur Moderator*innen alle Studierenden sehen. Studierende sehen nur sich selbst und alle Moderator*innen.
...
Die Einheit kann auf verschiedene Arten beendet werden, wodurch diese für Studierende nicht mehr in BigBlueButton aufgerufen werden kann:
- nach Ablauf der geplanten Dauer
- Verlassen des Klassenraums durch alle Moderator*innen
- das Aktive Beenden durch Moderator*innen
...

...
Wenn Sie bei den Einstellungen in Moodle den Instanztyp Raum / Aktivität mit Aufnahmen oder Nur Aufzeichnungen ausgewählt haben, können Sie im Klassenraum von BigBlueButton eine Aufzeichnung durchführen. Sollten Sie eine Aufzeichnung anfertigen wollen (vgl. Screencast, ...), dann können Sie die Aktivität anlegen, diese in Moodle verstecken, die Aufzeichnung durchführen und dann wieder sichtbar schalten.
Die Aufzeichnung steht Studierenden nicht während, sondern erst nach Ende der Lehrveranstaltung zur Verfügung.
| Warning |
|---|
Die Verarbeitung der Audio- und Video-Mitschnitte zu einer fertigen Aufzeichnung dauert mitunter mehrere Stunden und steht erst danach in Moodle zur Verfügung. |
Vorhandene Aufzeichnungen finden Sie in der Aktivität und können über Klick auf die Schaltfläche Präsentation abgespielt werden.
Die Details dazu können von Ihnen noch jederzeit bearbeitet werden (d. h. Titel der Aufnahme, Beschreibung) sowie im Bedarfsfall auch manuell verborgen (rechts, über Klick auf das Auge-Symbol) oder gelöscht werden (über Klick auf das Papierkorb-Symbol).
...