
BigBlueButton, accessible via Moodle, is an effective video conferencing tool for presentations, seminars , and lectures and resentations. This tool allows you, for example, to share video and audio streams, make presentations available to students or to engagen them using polls, chat or an audio connenctionpresentations with your students or interact with them by using polls, etc. Students can leave their own feedback in a chat or audio .... It is also possible to allow additional people to participate by sending them an "external guest access link".Anchor Beschreibung Beschreibung
| Info | ||
|---|---|---|
| ||
01/2021 You will find FAQs on a new page: FAQs - Lehrende. 12/2020 You can now upload presentations via "Moodle settings" 9.12.2020 – Now you can upload presentations directly in the Moodle settings again. 11/2020 – If you and your students seem to have been directed into different BBB-rooms, please check, whether the group mode might be enabled. 28.09.2020 – Participants rights can be set in Moodle while creating the activity and waiting room function 02.09.2020 – Upgrade to Moodle 3.9: now you can create an External guest access link (as well as an Access code), to invite external people to participate in your session! 13.08.2020 – Re-using existing recordings in the next semester To be able to use existing recordings of BigBlueButton in a following course, you can use the function "Import recording links". |
| Warning | ||||||
|---|---|---|---|---|---|---|
| ||||||
For uninterrupted conferencing, please enable only those webcams, that are needed. We recommend to have not more then five cameras translating ; we recommend a maximum of 5 webcams transmitting at the same time!
If your sessions is to have more than 100 participants, you can record your lecture and share it with the It is possible to record your conference which you can then share with your students afterwards. |
| Note | ||
|---|---|---|
| ||
If you are experiencing any operational problems, please use try using a different web browser (not all web browsers are fully supported by BigBlueButton). |
Contents
| Table of Contents |
|---|
cause disruption during the transmission or worse cause it to shut down. |
Contents
| Table of Contents |
|---|
| Info |
|---|
| Info |
If you would like to use this activity forBigBlueButton more than one time in your Moodle-course unit, you must create multiple identical activities or duplicate an already existing one. |
Part 1 - Preparation and implementation in Moodle
Adding a session
...
To use BigBlueButton as part of your Moodle course, you first have to integrate it by selecting Add an activity or resource.
...

Configuration
| Anchor | ||||
|---|---|---|---|---|
|
You can choose between three options:
- Room/Activity only: Basic basic use of the session in your Moodle course with a live presentation (without the recording function enabled) and a link to join it.
- Room/Activity with recordings: Use of the session as a live presentation as well as additional recordings (recordings will be accessible in Moodle after the session has ended)in additon to your live presentation you have the option of recordings which you can create during your session, but you can also display links to already existing recordings.
- Recordings only: only links to already Recordings only: Already existing recordings can be displayed via this function.

...
| Note |
|---|
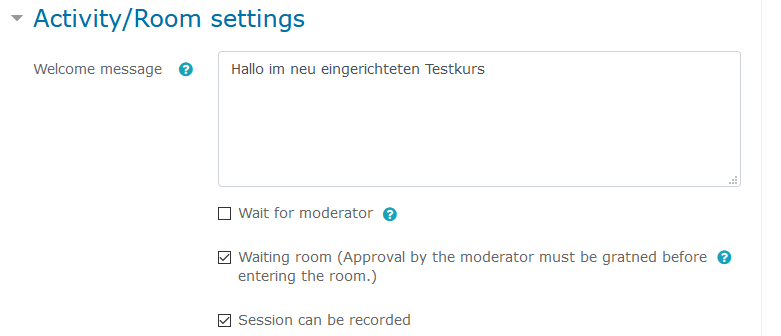
If you like to do a recording of your session, make sure that there is a tick in the box "Session can be recorded" further down in the Activity/room settings. The recording function itself can be startet directy in BigBlueButton when you have started your session (see below). |
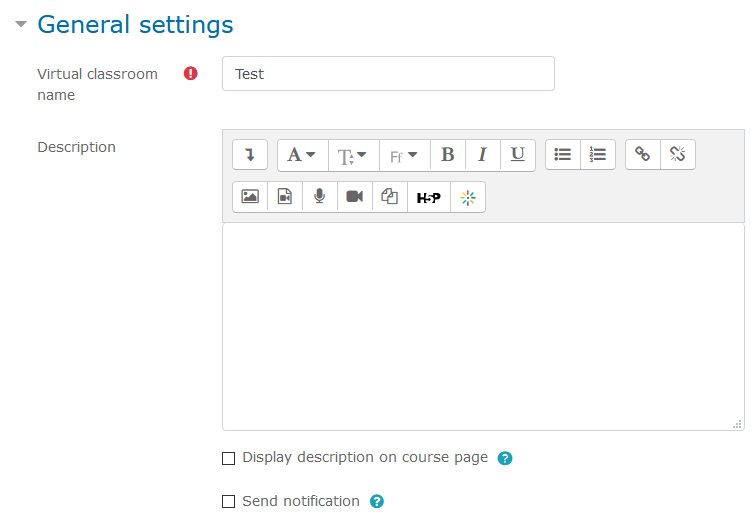
2. First, you can define General settings:Start by defining your General settings, like in every other Moodle-activity:
- Give your virtual room a name for your session in Name of your session under Virtual classroom name (this which will be displayed as a link in the your Moodle-course).
- To notify e.g. students of a new BigBlueButton session, enable the option Send notification.
after klicking on Show more, you can also:
- If necessary, add further information under Description. Tick Display description on course page, if you would like the description to be visible .
- To notify students of the creation of a new BigBlueButton activity, enable the option Send notification.

- under the name of your room.
3.
| Anchor | ||||
|---|---|---|---|---|
|

which will be shown in the chat after somebody joined the session. You can decide if you want that students have to wait for a moderator can before they can enter the room; and you can create a waiting room.
If you have chosen Room/Activity with recordings in the instance type settings above, you can authorize that the Session can be recorded.
| Anchor | ||||
|---|---|---|---|---|
|
If the option Waiting room is enabled, the moderator will get a message to inform him that somebody wants to join the session and he can then authorize their access.
A person who joined your session will then see:

And a moderator: Screenshot fehlt
Anchor
If the instance type "Room/activity with recordings" was selected above, you can set determine, whether a session can be recorded.
4. | Anchor | ||||
|---|---|---|---|---|
|
You have to activate this function by choosing the checkbox "Create gust guest access link for external participants".

Further settings need to be configured directly on the activity page of the session (further information: Using the external guest access link).
...
- Share webcam: let other participants see your webcam image
- See other viewers webcams: see webcam images of all other participants, not only moderators'
- Share microphone: make your audio available to others
- Send public chat messages: to chat with all other participants
- Send private chat messages: send private messages to other participants (sending messages to moderators is always possible)
- Edit shared notes: use the shared notes feature
- See other viewers in the users list: see the names of other participants in the session
...
| Function | Meaning | ||
|---|---|---|---|
| Share webcam | Here you can define whether students can share their webcam with others. The default setting is that students cannot share their webcam.
| ||
| See other viewer webcams | Here you can define, whether students will be seeing other student's webcams or if just moderators can see them. The default setting is that only moderators can see shared webcams. | ||
| Share microphone | Here you can allow students to share their microphone. The default setting is that only moderators can decide to share microphones. | ||
| Send Public chat messages | Here you can define whether students can write messages in the public chat that can be read by all participants. The default setting is that all students can write messages in the public chat. | ||
| Send Private chat messages | Here you can define whether students can send private messages to participants who are visible to them. Click “See other users in the list of users” below to make students see the names of all other participants. If this option is unchecked, private messages to moderators will still be possible. The default setting is that students can send private messages to all participants who are visible to them (with default settings: only moderators). | ||
| Edit Shared Notes | Here you can define whether students can create and edit notes in the shared notepad. The default setting is that students cannot edit shared notes. | ||
| See other users in the Users list | Here you can define whether students can see other students in the list of users. The default setting is that only moderators can see all students. Students can only see themselves and all moderators. |
...